strawberry frozen yogurt
August 31, 2010 § 5 Comments

To state the obvious, I am not usually a fan of low-fat desserts. I love butter and cream and eggs, and now I’ve even devoted a blog to combining them in as many ways as possible (I’m still not sure this is a good idea.) But although frozen yogurt is also considered a low-cal alternative by many people, I actually love it – it’s not an ice cream substitute, it’s an entirely different concoction, delightfully tangy and light and refreshing. It also has enough sugar in it to make any health food label a bit of a stretch.

I usually like my ice cream to be rich and decadent and studded with chunks of deliciousness, preferably in cookie dough form. But frozen yogurt is beautifully suited to fresh fruit, and I caught one last gorgeous batch of local strawberries to make it. It’s one of the easiest desserts you can make as long as you don’t mind waiting a few hours: let berries macerate in sugar, chill with yogurt, freeze in ice cream maker. 10 minutes of labour gets you a brilliantly coloured, slightly-less-bad-for-you dessert!
Incidentally, I accidentally took this even further off the healthy spectrum when my hand slipped and I added about three times as much vodka as I meant to. Oops! I was concerned at first, since the purpose of adding alcohol is to prevent the yogurt from freezing too solidly, but with the amount I used it actually stayed a perfectly good consistency. I don’t know that I’d recommend it, though – people, be careful with your vodka.

Strawberry Frozen Yogurt – adapted from The Perfect Scoop
-
1 pound strawberries
1/2 cup to 2/3 cup sugar (I prefer 1/2 cup, but most of my family likes the original amount of 2/3)
3 teaspoons vodka
1 cup Greek-style or whole-milk yogurt
1 teaspoon fresh lemon juice
Hull the strawberries and slice into small pieces. Gently stir in sugar and vodka, until sugar starts to dissolve. Cover and let stand at room temperature for 2 hours, stirring occasionally.
Transfer the strawberries and their juice to a food processor, and add yogurt and lemon juice. Blend until the mixture is smooth. If you like, strain the mixture to remove the seeds (I don’t bother). Chill for 1 hour, then freeze in ice cream maker.
simple blueberry tart
August 18, 2010 § 8 Comments

I’ve had a fair amount of practice now, but I’m still a little wary of making pie crust. I’m getting good at the whole cutting-in-the-butter process, but rolling out pastry is still embarrassingly hard for me. Why is it so hard to roll things? It seems like a basic skill. Along with doing the laundry before completely running out of clean clothes, and remembering to put on sunscreen. I guess there are a few things I need to work on.

I gave myself a break with this tart – it uses a pat-in crust that is refreshingly simple. Even more refreshing is the filling: although my summers are usually a time for pies and crumbles and other things best served warm, it’s been unbearably hot and this tart has a stovetop filling, that sets in the fridge. Half the berries are cooked into a velvety base, and then fresh berries are folded in so that you still get tart berry explosions in every bite. It is very pretty before you cut into it, and then when you take a slice it kind of splodges everywhere. But no one minds, everything is splodgy once it’s in your tummy anyhow.

Fresh Blueberry Tart– adapted from The Canadian Living Cookbook
Pastry:
-
1 1/4 cups flour
3 tablespoons icing sugar
Pinch of salt
2/3 cup cold butter, cubed
Filling:
-
2/3 cup sugar
3 tablespoons cornstarch
Pinch of salt
1/3 cup cold water
5 cups blueberries, divided
1/2 teaspoon cinnamon
1/2 teaspoon lemon zest
2 tablespoons lemon juice
1 tablespoon butter
Preheat oven to 350°F. Stir together flour, sugar, and salt. Using pastry blender or two knives, cut in butter until crumbly. Press dough together with fingers until it holds together. Press dough into 10-inch tart pan with removable bottom. Prick all over with fork. Bake in bottom third of oven until light golden, about 20 minutes. Let cool on rack.
For the filling: In a saucepan, stir together sugar, cornstarch and salt. Whisk in water, 2 cups blueberries, lemon zest, and cinnamon. Bring to simmer over medium heat. Reduce heat and simmer gently, stirring often, until glossy and thickened (about 10 minutes). Remove from heat and stir in lemon juice and butter. Let cool slightly.
Gently stir remaining berries into cooked berry mixture. Spoon into prepared crust and smooth top. Refrigerate for about 30 minutes, or until set.
chocolate blueberry clusters
August 8, 2010 § 4 Comments

I’ve been away from this little blog for so long! And although I’m not sure anyone else out there has noticed, I’ve missed it. First I was away in San Antonio, eating gargantuan plates heaped with cheese and sour cream and salsa, and oh my things there are a bit more spicy than I’m used to. Then I was away at my dad’s cottage, in near isolation from the outside world. That was lovely. And once I recovered from the Texas food coma (this took several days) I was ready to bake again! But baking in a cottage environment is no easy task, although of course I unwisely attempted it.

The main problem is that the kitchen isn’t stocked for baking, because I use it one week a year, and even I am not quite crazy enough to buy a set of cake pans and spices for that amount of time (I almost cracked and bought a muffin tin, but restrained myself in time!). Instead I had to look around and make do with what we had, which luckily for me, was incredible, tiny wild blueberries, which were some of the prettiest fruit I’ve seen. They were so fresh and flavourful it seemed like a waste to bake with them – who would appreciate their delicacy once they were mushy inside a muffin? Instead I made the simplest dessert ever: chocolate covered blueberries. They’re ugly but delicious, the chocolate crackles and the blueberries burst and together they’re a perfect combination. They were so popular with the family that my ever-mature father took to calling it ‘blueberry poop’ in the hopes of dissuading the rest of us from eating them. Sadly for him, this brilliant tactic did not work.

Chocolate Blueberry Clusters
If you’re going to be serious about this, you should temper the chocolate, but that would defeat the whole simplicity point and I really couldn’t be bothered. Instead, just store them in the fridge.
-
1/2 cup wild blueberries
80 grams good-quality dark chocolate (I used Lindt 70%)
Line a baking sheet with wax paper. Melt chocolate very gently in the microwave. Stir in blueberries. With a spoon, scoop out clusters of blueberries onto prepared sheet. Refrigerate until set. Transfer to airtight container and store in refrigerator (unless you tempered the chocolate). Keeps for 2-3 days, but probably no more since the fruit is fresh.
piñata pavlova
May 25, 2010 § 6 Comments

There are some recipes that just make me nervous. Yeasted doughs, anything involving caramel, and in particular: meringue. It’s even worse when I have a crowd to bake for, who can judge me for my failures. This anxiety may demonstrate that I in fact lead a quite sheltered life, in which the scariest event is baking. But it’s serious stuff! So why did I decide to make pavlova just as people congregated at my house for a barbecue? I have no idea, and somehow it worked out perfectly.

My incredibly talented friends constructed a piñata (seriously!) and we grilled en masse in the backyard. I ducked out partway through to assemble the dessert – you can make most of this ahead of time, but it doesn’t hold up long once it’s all put together. My heartstopping moments came mostly as I was making the meringue, and the peaks most obstinately refused to stiffen. It did get properly glossy though, so eventually I just shoved it in the oven and hoped for the best.

The pavlova turned out beautifully: it was crisp, melted in your mouth, and somehow didn’t break when I turned it out of the pan. Three layers are stacked with whipped cream and macerated berries, making for a gorgeous dessert. The pavlova is also flavoured with brown sugar, which gives it more depth than the typical recipe. My only minor complaint is that I think I don’t actually love pavlova. It’s all about sugar and not a trace of butter, which is the opposite of what I normally go for. But this recipe really is perfect, so if you’re a meringue-lover, make it!

Triple-layer Brown Sugar Pavlova – adapted from Gourmet
Note: The meringue takes 2 hours in the oven, so it’s not a last-minute dessert. But it can be made ahead that day, or frozen up to a month earlier.
For meringue:
-
Confectioners sugar for dusting
1 cup superfine granulated sugar – I substituted 1 cup granulated sugar, whizzed in the food processor for 15 seconds.
1/2 cup packed light brown sugar
1 1/2 tablespoons cornstarch
1 1/2 teaspoons pure vanilla extract
2 teaspoon distilled white vinegar
3/4 cup egg whites (from 5 to 6 large eggs), at room temperature 30 minutes
Pinch salt
For berries:
-
1 1/2 pounds strawberries, trimmed and quartered
1 pound blackberries
2 tablespoons granulated sugar
For cream:
-
1 cup chilled heavy cream
1/3 cup chilled sour cream
Make meringue:
Preheat oven to 275°F. Lightly butter 3 (8-inch) round cake pans, then dust sides of pans with confectioners sugar, knocking out excess. Line bottom of each pan with a round of parchment paper.
Pulse superfine sugar (or pre-processed regular sugar), brown sugar, and cornstarch in a food processor until well combined.
Stir together vanilla and vinegar in a small bowl.
Beat egg whites with a pinch of salt using an electric mixer at medium speed until they hold soft peaks. Increase speed to medium-high and add sugar mixture 1 tablespoon at a time. After all sugar has been added, beat 1 minute more. Add vinegar mixture, then beat at high speed until meringue is glossy and holds stiff peaks, about 5 minutes. (My meringue got glossy but the peaks never quite made it to stiff – it still turned out great.) Spoon meringue into pans (about 2 1/2 cups per pan) and smooth tops.
Bake until meringues have a crisp crust and feel dry to the touch, about 1 hour (insides will still be marshmallow-like).
Turn oven off and prop door open slightly with a wooden spoon. Cool meringues in oven 1 hour. (Meringues may sink slightly and crack while cooling.)
Run knife along sides of cake pans and very carefully turn meringues out of pans. Carefully peel off parchment (meringues will be fragile and the crust may crack further). Carefully turn right side up.
Macerate berries:
While meringues cool, toss berries with sugar and let stand at room temperature until ready to use (up to 1 hour).
Assembly:
When ready to assemble dessert, beat heavy cream with sour cream using an electric mixer until it just holds soft peaks. Put 1 meringue on a serving plate and spread one third of whipped cream over it. Spoon one third of fruit (with juice) over top. Repeat with remaining meringues, cream, and fruit.
Note: If you want to make your meringues ahead of time and freeze them, wrap them individually and freeze for up to a month. Thaw at room temperature, still wrapped, for at least 2 hours.
p.s. here is our beautiful piñata. It’s a mouse! With a hat, of course.

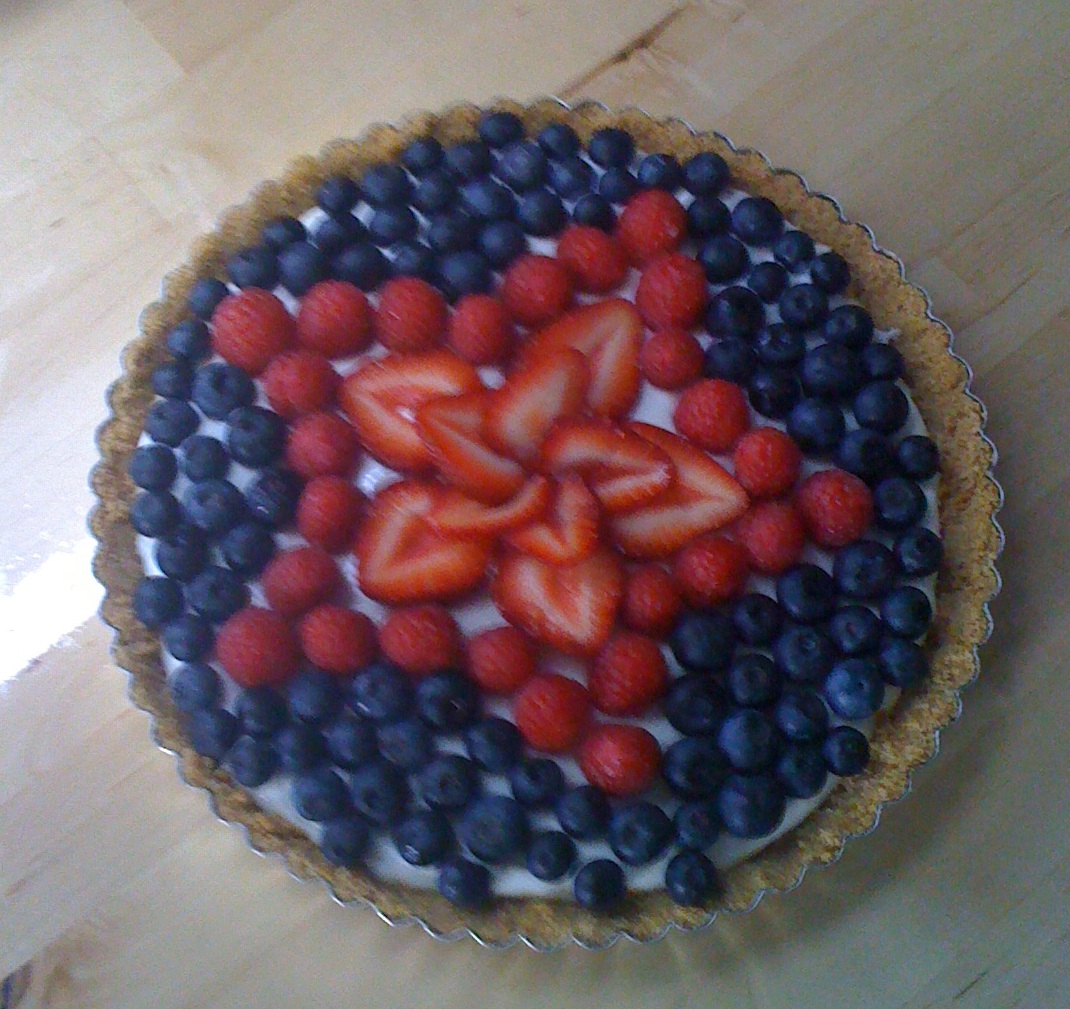
Red, white and blue tart
July 27, 2009 § 4 Comments
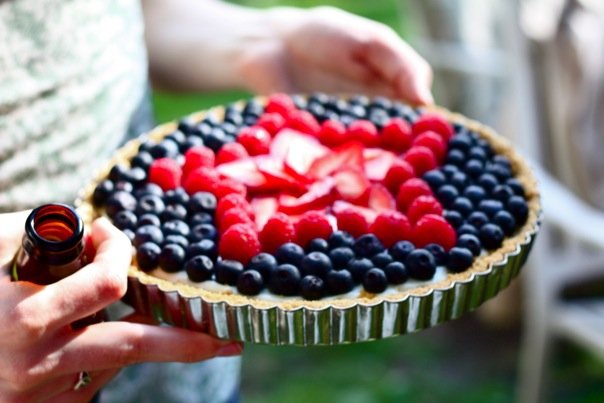
hmm… after weeks of inertia, I’ve been forced into action by the fact that Melissa is now following this blog… kinda mortifying to not actually have anything on it. But I’m also too tired to write anything intelligent, so I will just put up a pretty picture! Demonstrating my extreme patriotism.
Okay, maybe I’m motivated enough to include the recipe too… after all, that was kind of the point of this whole thing.
Red, White and Blue Tart (adapted from various Epicurious recipes)
Crust:
- 8 whole graham crackers, coarsely broken
- 1/4 cup (packed) golden brown sugar
- 1/4 cup (1/2 stick) butter, melted
Filling:
- 6 ounces cream cheese, room temperature
- 1/3 cup sugar
- 1/2 cup sour cream
- 2 teaspoons fresh lemon juice
- 1/2 teaspoon vanilla extract
Topping:
- 2 large strawberries, hulled, sliced
- 2 1/2-pint containers blueberries
- 1 1/2-pint container raspberries
*** Note: This recipe makes a 9-inch tart. I actually roughly scaled these amounts up for a 10-inch pan, it worked beautifully and tasted amazing. Also, if you tuck the strawberries into each other like a fan, people think you’re really fancy…
Make crust:
Preheat oven to 375°F. Grind crackers and sugar in processor until coarse crumbs form. Add butter and process until crumbs are evenly moistened. Press crumb mixture firmly onto bottom and up sides of 9-inch-diameter tart pan with removable bottom. Bake until crust is firm to touch, about 8 minutes. Cool crust on rack.
Make filling and topping:
Using electric mixer, beat cream cheese and sugar in medium bowl until smooth. Beat in sour cream, lemon juice and vanilla. Spread filling in cooled crust. Chill until firm, at least 4 hours. (Can be made 1 day ahead. Cover; keep chilled.)
For topping:
Arrange strawberry slices in star pattern in center of tart. Arrange raspberries in star pattern. Surround with blueberries. Cover loosely and chill until ready to serve. (Can be made up to 6 hours ahead.)
Oh, and this picture, while less pretty, gives a better idea of how to arrange the berries: